How to Reorganize and Decorate Your Desk

Most of us use a desk for…everything. Watching videos, playing games, doing hobbies, finishing homework. Desks tend to get cluttered easy, but with some good organization and decoration it becomes easier to direct your focus to the right things!

Cleaning

When cleaning, it helps to start with one place at a time. Try just doing one desk drawer or picking up one type of supply. You don’t even have to clean everything up in one sitting, you can do it over a day, over a week, etc.

Putting markers back in boxes, stacking papers, and throwing away scraps are good ways to start that aren’t too overwhelming. Do whatever works for you!

When deciding whether something should be thrown away, consider whether you might need it later or if it has sentimental value to you. Loose papers and plastics should be recycled, if possible.

Now for the redecorating!

Storage

Desk drawers get easily cluttered. It helps to divide them with trays so you can easily sort, say, pencils from pens, or highlighters from erasers. If your desk doesn’t have drawers, keep your supplies in a bag or container that’s nearby and in view. If your supply storage is somewhere harder to reach, you might get lazy and just leave things out on the table!

If you have a lot of cables to your devices, try separating them using a cable organizer to avoid tangles.

Desktop

If you find that your desk gets a lot of scratches or marks, you can try getting a protective deskmat that can withstand some blows.

Lighting

Lighting is a great way to enhance the mood of your work area. Maybe you want to try hanging fairy lights for something cozier, or desk lamps. Different colors can also change the feel of your desk, so try them out!
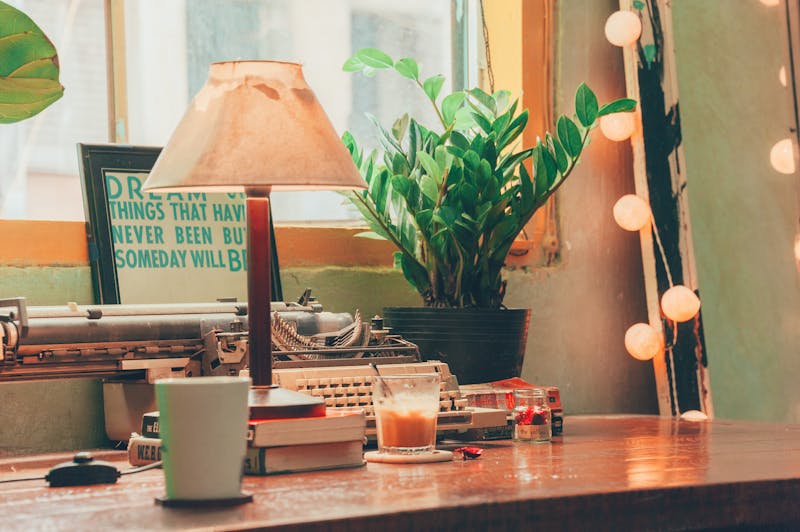
Wall Decor

Besides just the area on your desk, the walls around or behind it can be decorated! Try hanging up posters, prints, or if you dabble in art, even drawings of your own. Just make sure that whatever you use to hang them off won’t damage your walls, and you’re good! You can also hang up objects or props you love, as well as plants (real or fake!).

Habits

Cleaning your desk one time won’t solve the problem forever. When you take something out, put it back when you’re done. Plus, doing small sweeps regularly to rid your desk of trash is easier than letting it pile up.

And that’s it! Redoing your desk can help motivate you to finish work and make the space feel more comfortable. If you want more ideas, try looking up references, as they’re a great place to start. Good luck!

Ways to Decorate Your Bookshelf at Home

  • Sculptures and figurines: This is a really great way to theme your bookshelf if you want to relate it to a certain genre or character such as dragons. They can also simply be mini replicas or figurines of characters that don’t neccessarily belong to a book you’re reading but fit a similar aesthetic.
  • Vases and plants: They don’t have to be real, but sometimes adding a little color can make it more aesthetically pleasing and bring a pop of life onto the shelves.
  • LED and fairy lights: These can help give a warmer atmosphere to your reading nook, creating an almost mystical vibe as you dive into your next book. It espescially helps on cold or dark nights.
  • Artwork: It could be something simple like a quote from your favorite character or book. You could also put up a picture of your favorite scene or city from a book. Either way, adding artwork can really make the space feel more personal and related to what you’re interested in.
  • Color gradients: Some people like rainbows while others like organizing their books based on series or creating a fading gradient across the shelves. Based on your own personal preference, this could be the perfect chance to experiment with what works for you.
  • Themes: Sometimes changing up the decor on your bookshelf can also make it more refreshing or relaxing. Some themes you could choose from are seasonal or even genre-related.

How to Leaf Bleach Clothes

It was New Year’s Eve, but instead of celebrating with drinks and parties, my cousin and I sat in a cold garage that stunk of bleach. To give some context, my cousin had been inspired by hoodies and shirts that had leaf imprints on them. We wanted to try it out using bleach. It took lots of trial and error to find an efficient and effective process. Here’s what we did:

Materials: Cotton clothing, Paintbrush (that you don’t mind ruining), Bleach or any cleaning solution containing bleach, Paper plate, Book or other flat and heavy object, Leaves of varying shape, Steam iron press, gloves, and a mask.

  1. Go outside or in a ventilated area. Cover the floor if you’re worried about stains, and put on your gloves and mask.
  2. Pour the bleach into a paper plate, start heating the iron, and lay out your hoodie. Decide on a layout for the leaves.
  3. Take your paintbrush and brush bleach onto the leaves. The more you use, the more vibrant the print will be.
  4. Press the bleached side of the leaf onto the clothing and use a book to flatten it; Do not smear and hold for about 10 seconds.
  5. Peel the leaf off and immediately press the iron into the bleached area of the clothing. This should bring out the pattern.
  6. Repeat steps 3-5 for the rest of the leaves. You can reuse leaves as long as they are intact. 
  7. Leave the clothing out to dry in the sun, then machine wash.

The result should be an orange-brownish pattern of leaves on the clothing with the leaf’s veins and texture visible. If any of the above steps don’t work, there are a few things you can try. First, make sure your bleach isn’t expired. Second, if liquid bleach doesn’t show on the clothing, try a pasty cleaning solution that contains bleach. We used a Soft Scrub cleanser and painted that onto the leaves. Third, check that your clothing is 100% cotton. This is how ours turned out– Happy bleaching!

How to Make French Toast

This summer, I started making my own breakfast almost every day. Apparently I have a high taste for food because I started making myself things like crêpes, waffles, omelets and FRENCH TOAST. I found this French toast recipe online, tweaked it a teeny tiny bit and eat it maybe once a week now. 

THE RECIPE

Prep Time: Approximately 2 minutes or less

Cook Time: Maybe 3-5 minutes

Ingredients

  • ⅓  cup of milk
  • 1 eggs
  • ½  teaspoon of vanilla extract (Optional) (I put it in for flavor and once did not have enough, but it was still delicious. I recommend putting the vanilla in)
  •  ≈ ¼ teaspoon of cinnamon (Optional) (I put more in and dust the toast while its cooking)
  • Salt (If you want, I dont put any)
  • 3 pieces of bread 
  • Butter to grease the pan

Step 1

Get all of your ingredients and whisk everything but the bread and butter together in a shallow bowl. (I use a cereal bowl)

Step 2

Butter your pan and heat over high heat

Step 3

Dunk your bread in your milk mixture for 3 seconds on both sides. I also sink the crusts.

Step 4

Move your bread onto your hot pan and lower the temperature to medium heat. Cook until the crusts are golden brown, (like the color of almonds or dulce de leche)

Step 5

EAT YOUR DELICIOUS CREATION. I prefer to top mine with maple syrup and more cinnamon.

I really like this recipe and think that it’s really easy to make while half asleep in the morning. I do recommend it for any people who like sweet breakfasts that don’t require much cooking.

“Marie Kondoing” Your Room

Now, I am going to assume that not everyone knows who Marie Kondo is. Marie Kondo is a Japanese woman who has various TV shows and books about organization. My mother, along with many other moms, has watched one of her shows at one point or another. So when I talk about ¨Marie Kondoing¨ my room, I mean cleaning and organizing my room. Even though, and I will admit, I don’t particularly like cleaning/organizing in my free time, I did when I was super bored one day. The results of my cleaning, I am extremely happy about. So here are the pros of cleaning my room:

  • Less cluttered. It doesn’t feel suffocating to be in my room.
  • More space. There is more space for future items, and just space. The space is so nice to have in a room.
  • Getting rid of stuff. I found so much stuff in my room that I honestly have no idea was there. I found the container of an old marker making machine, a rock, empty paint tubes and a 3D pen. Random stuff. 
  • Finding things that I like. I found a pair of new(ish) shoes from my mother and a coil of LED lights.
  • Decorating. I used the stuff I found to decorate my closet and my desk

AND FINALLY

  • It makes me feel more calm and mature. My room feels lighter and it makes me feel less anxious. It makes me feel more chill.

The method I used to clean my room was the Marie Kondo way, which involves feelings. What you do is hold up each item and ask yourself, ¨Does this bring me joy? Does it have a purpose or a reason?¨ Doing this, I realized how much stuff I had that was useless and brought me no joy whatsoever. 

My now clean room makes me feel ready for the school year and all the stress that comes with it. I really recommend cleaning your room for a less cluttered mind and a more calm mindset. 

Books by Marie Kondo are available to check out from the Mission Viejo Library. It is also available to download for free from Libby.

The Best Chocolate Chip Cookies Ever

Anyone who stays at the DoubleTree knows that the best part is the warm welcoming cookies homemade by the hotel. If you are opposed to making a reservation just for the famous cookies, this recipe is just for you.

Ingredient List:

Chocolate Chip Cookies

  • ▢ 1/2 pound of softened butter (2 sticks)
  • ▢ ¾ cup + 1 tablespoon granulated sugar
  • ▢ ¾ cup packed light brown sugar
  • ▢ 2 large eggs
  • ▢ 1 ¼ teaspoons vanilla extract
  • ▢ ¼ teaspoon freshly squeezed lemon juice
  • ▢ 2 ¼ cups flour
  • ▢ 1/2 cup rolled oats
  • ▢ 1 teaspoon baking soda
  • ▢ 1 teaspoon salt
  • ▢ A pinch of cinnamon
  • ▢ 1 3/4 cups chopped walnuts (optional) 
  • ▢ 3 cups semi-sweet chocolate chip
  • 1. Preheat the oven to 300°F
  • 2. Cream butter, sugar, and brown sugar in the bowl of a stand mixer on medium speed for about 2 minutes.
  • 3. Add eggs, vanilla, and lemon juice, blending with a mixer on low speed for 30 seconds, then medium speed for about 2 minutes, or until light and fluffy, scraping down the bowl.
  • 4. With the mixer on low speed, add flour, oats, baking soda, salt, and cinnamon, blending for about 45 seconds. Make sure not to overmix.
  • 5. Remove bowl from mixer and stir in chocolate chips and walnuts.
  • 6. Portion dough with a scoop (about 3 tablespoons) onto a baking sheet lined with parchment paper about 2 inches apart.
  • 7. Optional: Sprinkle a pinch of salt on top of each cookie to create a salty and sweet masterpiece.
  • 8. Bake for 20 to 23 minutes, or until the edges are golden brown and the center is still soft.
  • 9. Remove from the oven and cool on a baking sheet.

Enjoy!

-Harrison S.

How to Make Spam Musubi

Spam musubi is one of my personal favorite snacks to make whenever I have free time. Its a very simple dish to create using only a few ingredients.

Ingredient List:

Spam Musubi

  • ▢ 1.5 cup/310g Rice (uncooked)
  • ▢ 1 tbsp Toasted sesame seeds
  • ▢ 1 Nori seaweed sheet 
  • ▢ 1 can of small Spam 7oz(200g)
  • ▢ 2 tsp vegetable oil

Spam Sauce 

  • ▢ 1 tbsp soy sauce
  • ▢ 1 tbsp sake
  • ▢ 1 tbsp rice vinegar
  • ▢ 1 tbsp sugar
  • ▢ 2 tsp Katakuriko (potato starch)
  • ▢ 1 tbsp water
  • 1. Cook rice by the instructions listed on your rice cooker.
  • 2. Once the rice been cooked, sprinkle toasted sesame seeds into the rice.
  • 3. Slice the spam ham into 6 even slices.
  • 4. Heat a frying pan over medium heat with vegetable oil
  • 5. Add Spam. Cook and brown each side for about 2-3 min.
  • 6. Set aside the cooked spam slices. Then place all ingredients into the pan and reduce the heat to low.
  • 7. Stir continuously until thick, put the Spam slices back into the frying pan and coat the spam with the sauce. Turn the heat off.
  • 8. Next is to assemble the Spam. I like to use a specific mold for Spam, but if you don’t have one there is a very easy alternative. Line a washed spam tin with cling wrap and put 1/6 of the cooked rice into the tin.
  • 9. Press the rice down with your hand. Add a piece of spam on top and press.
  • 10. Remove the spam and rice, place the nori strip over on the centre of the spam and wrap over the musubi.

Enjoy!

-Harrison Schreiman

My Top Five Crochet Stitches

Now that summer is here, I find myself picking up my crochet hook again to finish a few projects that I had shelved during the school year. I started crocheting about two years ago, and so I’ve picked up a few stitches through my various projects. Here is a list of my top five:

5. Crocodile Stitch

Crocodile Stitch (The Spruce Crafts)

Now, I am not a huge fan of textured stitches, which is probably why this stitch is #5 on my list. However, this stitch was just so much fun for me. I love how well it layers and how pretty it looks. The first time I encountered this stitch was when I was trying to make a little Christmas tree ornament (which I succeeded in making) and the crocodile stitch was perfect for it.

This stitch is a little confusing though, probably a more advanced-beginner level. Knowledge of how to work post stitches is required. I used Bella Coco’s tutorial to learn it: https://youtu.be/X831BvT42xU

4. Sprig Stitch

Sprig Stitch (Bella Coco)

The Sprig Stitch is another great stitch that I use. It’s really simple and works up quite fast. The only reason it’s not absolutely amazing (for me) is that it’s got a few (make that lots of) holes. I don’t like making blankets that have a ton of holes, mostly because I tend to get things stuck in them, but this stitch is perfect for making cupholders (and sometimes decorative potholders), of which I have quite a few.

I used Bella Coco’s tutorial to learn the sprig stitch: https://youtu.be/ORBx8zKK1Qk

3. Puff Ripple Stitch

Puff Ripple Stitch (Hooked by Robin)

Now, “Puff Ripple” is a pretty generic name, so there’s a lot of Google results that are all different, but the photo above is the puff ripple stitch that I learned by Hooked by Robin (tutorial: https://youtu.be/BmtwZ7gTd6c)

This is one of my favorite patterns, mostly because it’s quite simple to hook and it features a wavy shape as you make it. In addition, the puff stitches are super small and quick, so this is definitely a very easy stitch as long as you know how to make puffs.

2. Jasmine Stitch

Jasmine Stitch (Desert Blossom Crafts)

The Jasmine Stitch is another example of a stitch that uses puffs, but it’s also quite a bit more complicated because you have to keep more loops on your hook (I think the max is 13 at a time). Nonetheless, I love this pattern because it’s so pretty and it’s a stitch that I use to make the most beautiful projects with.

I learned this stitch by watching Bella Coco’s tutorial: https://youtu.be/C83LRlRm7l4

1. Trinity Stitch

Trinity Stitch (Nordic Hook)

Lastly, the trinity stitch is my absolute go-to stitch, because it’s completely solid, with no holes whatsoever. The stitch works up quite quickly and I keep coming up with a myriad of uses for it. Although it’s not as pretty as the Jasmine stitch, it still features a star-type flower pattern. The only drawback is that it’s super dense, so I would not recommend it as a shawl or something else that is supposed to be light and airy.

Find Hooked by Robin’s tutorial here: https://youtu.be/AB0cFTJlURs

So, there’s a list of my top five stitches, and if you crochet I hope you find a stitch that you like. If you don’t crochet, maybe it’s time to pick up a hook and a new hobby!

Let me know in the comments what your favorite stitch is 🙂
~ Kailyn L.

My Top Five Crochet Blanket Patterns

I find in summer that I have a lot more time to sit back and relax, and I spend that time crocheting. I enjoy making blankets, either to be donated or to be used as Christmas presents, so here are my top five favorite patterns.

5. Tesselated Hearts

Tesselated Hearts (Fiber Spider)

This is a very simple tesselated hearts filet pattern that I enjoyed making very much. I chose a gray yarn to make this pattern with, and it’s working up well. The only thing I don’t like about this pattern is that it is worked in rows, not rounds, and I don’t much enjoy working in rows.

Fiber Spider’s tutorial (Part 1): https://www.youtube.com/watch?v=DRAujqZFvS4

4. Bavarian Stitch

Bavarian Stitch Blanket (The Spruce Crafts)

The Bavarian Stitch Blanket is a great blanket to make. It involves post stitches, which creates lovely texture. However, it is a bit more challenging than some other blankets.

I used Hooked by Robin’s tutorial to learn how to crochet this blanket: https://www.youtube.com/watch?v=4I1KbQWtdBU

3. Star Blankets

12-Point Star Blanket (The Loophole Fox)

There are two different star blankets that I’m thinking of, the 5 point star and the 12 point star. Both are worked in-the-round. I made the 12 point star for my baby brother as his own baby blanket, and it turned out really beautiful with a variegated teal yarn. (I used Red Heart Super Saver Ombre in the color Deep Teal) The only downside is that it’s not a round or square blanket, it’s star-shaped.

Bella Coco has tutorials for both types of stars: https://youtu.be/2PXxA9CVOjo and https://youtu.be/nExlllN6NGw

2. Virus Blanket

Virus Blanket (Christine Pennylegion)

The first I made the Virus Blanket was for my mom, and I used a really bright variegated yarn pattern (Lion Brand Yarn Cupcakes in the color Clown Car). It turned out absolutely amazing. The only downside is that there are a few holes, but other than that, it’s a great in-the-round blanket.

There are so many different tutorials on this blanket, but the one that I used was Bella Coco’s: https://youtu.be/Rlf7em4OhZc

1. Lotus Blanket

Lotus Blanket (Hooked by Robin)

This is my absolute favorite blanket pattern. Ever. I made this for my aunt for Christmas, and it was so stunning. The only thing is it’s just a bit complicated, but you get rewarded with such a pretty design! Find Hooked by Robin’s tutorial (Part 1) here: https://youtu.be/L–tTTLAi5A

So, there’s a list of my top five blanket patterns, and if you crochet I hope you make an amazing blanket you enjoy. If you don’t crochet, maybe it’s time to pick up a hook and a new hobby! (You’ll definitely never run out of Christmas ideas too!)

Let me know in the comments if you’ve ever made any of these blankets. 🙂
~ Kailyn L.